Corona Rendering Engine für 3DS MAX
External Rendering Plugins there are many – today we want you to Corona Renderer imagine. Particularly in the architectural visualization – where it often arrives on photorealistic rendering and a compelling exposure of the scene there is a high standard of the rendered view. In addition to the render engines that a 3D program like 3DS MAX, Cinema 4D, etc. can bring from home are also external use „Render plug-ins“. A known example just for rendering in architecture here is as VRAY. Want to get more out VRAY then we recommend you here our tutorial Simple interior exposure with 3ds MAX + VRAY for beginners
OK – here we do want to look at a closer Corona. Corona Renderer is a so-called ray tracing, the photorealistic rendering delivers results and is often in architecture but also Produktvisualiserung. Especially in recent years, he has a lot of users to win over with the emphasis architectural rendering. Certainly not least because there is beside the commercial is also a free version of this render engine and since one can produce quite respectable results with little effort. The training period therefore falls within the ambit – a clear advantage for many architects!
Therefore, let’s look at a closer Corona in this brief tutorial, and provide you an insight into the workflow and the quality of earnings in the architectural representation.
A big advantage of Corona is its simplicity – you can already achieve good rendering quality after a short training. On the other hand Corona is certainly not the fastest, physical and most correct and most extensive renderer on the market – but by this clear positioning it certainly has its place in the scene. And the success of this strategy is ultimately also right! But you do provide best himself an impression to determine in which areas you can use it.
In this tutorial I will introduce you to what steps you have to create a natural lighting of interior scene with Corona in 3DS MAX shortly. Have fun!
Render settings for natural lighting
Although usually already can achieve good results with the default settings in Corona but you should understand a few points to prevent commonly reported issues. With problems I mean the reduction of the „noise“ effect – ie an inferior quality rendering. But with the following general tips you should achieve good rendering results directly from the beginning:
- For indoor scenes in which „Global Illumination“ plays an important role – ie the basic brightness in the room, for example, propagates through the reflected sunlight in the room – we should UHD cache use as a second GI solver Is this about Render setup-> Performance-> Global Illumination-> Secondary Solver
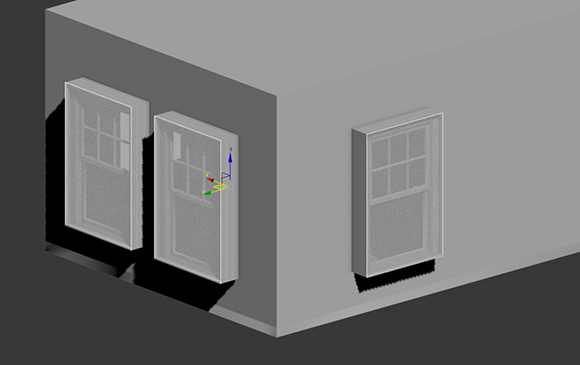
- If your interior has small windows or openings you should always called Corona portal use. With this you define quasi where light to enter your room. CoronaPortalMtl is a material which can be assigned to an area (this has no thickness!). This surface with this material you placed just in front of each chamber opening – almost like a sheet of glass. It is wichitg that you ALL window openings using this portal equips and not only what can be seen in subsequent rendering. Because of course can affect the exposure in the foreground and windows on the other side of space. The alignment of the area – defined by the „normals“ is irrelevant way. The portal in Corona are not really correct light sources they distribute the light only effective in space.
Here you see how I have placed the planes at my window.
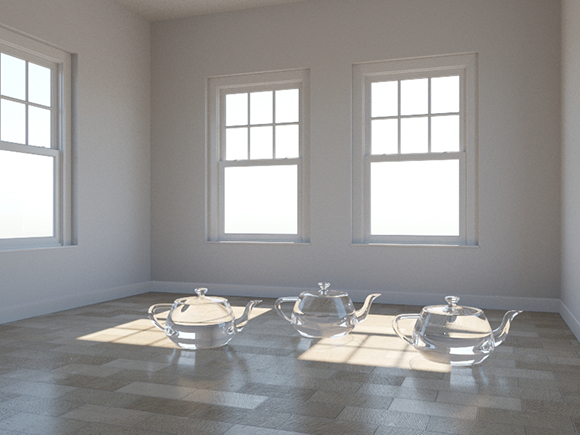
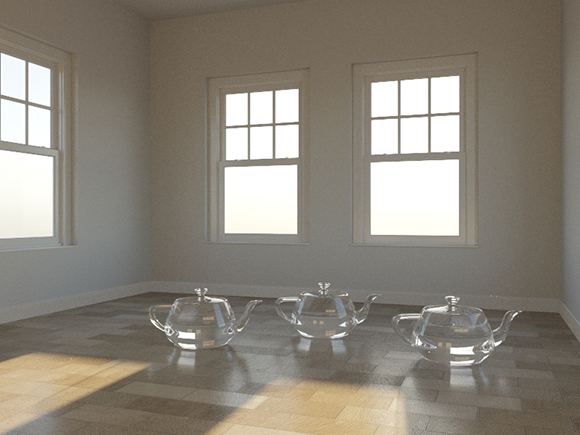
If we now fire up the first test rendering the whole looks but already directly useful from it?
As you can see I’ve here a simple test scene used – but if you like the stone floor you can download it for free you with us. It is included in „openArchiVIZpack“. If you have you are not downloaded our complimentary package with all kinds of graphic material for architectural visualization you should take a look on it. It contains 60 Indemnified architecture Staffage objects and textures and wallpapers for testing and learning – but also the use in commercial architectural rendering – ie contract work is allowed. More at the following link:
Corona materials: glass render
With glass is to be considered always be careful, because there but can dramatically increase the rendering time. Mostly it really does not make sense glass material for all glass elements such as windows, etc. to use. If you, nevertheless used glass elements, like our test teapots here in your scene should you the following two setting modes in at the Corona materials for refraction (refraction) consider:
- Thick – generates refraction effects (refraction) and should be used for massive objects. You can enable or disable Kaustikeffekte. I use this setting mostly for vases, glass objects or liquids
- Thin – produces no refraction effects – thus acts not as „all-glass“ and therefore empfielht for example glass sheets, soap bubbles or bulbs etc.
reduce noise effect in Corona rendering
If you, despite the use of „Light Potals“ still have problems with noise effects in Corona we have to take a closer look what is causing the problem
- If you have display problems on shiny or reflective surfaces you should the values for GI vs. AA balance increase
- If the direct light creates the problem you should the Light samples multiplier increase
- If it rather concerns areas with indirect exposure increases levels in GI vs. AA balance
- For problems with depth of field ( depth of field (DoF)) we should the values at GI vs. AA balance runterschrauben to about 6 or 4
Download 3DS MAX test scene
In our scenario, we use the Corona Renderer once as default – this we do over rendering tab-> Render Setup> Common> Assign Renderer and put Corona here on Production and store via Save as Defaults . We also set the values for Gamma / LUT Correction and System Units on the same values as in our last tutorial where we rendered with Corona.
To give you a better understanding of the settings you can also download our test scene you. I hope it motivates you yourself also something to play around with Corona. You can view the 3ds MAX sample scene lighting Download here:
In the scene we have also a free HDR Image (Sky) used, which can be downloaded to you here:
Last but as I said comes the high-resolution texture of stone floor of our „openArchiVIZpack“ which you here get. Look out for the „File Wall_033_color.jpg “ and “ Wall_033_bump.jpg “ – this looks like this:
Now you have to load everything you need to set the scene and to be able to understand the settings. So off you go!
Settings for sun and sky
Go on Command Panel> Create-> Lights-> Corona and choose here CoronaSun and create a sun – somewhere where you’d like. Below you can find underneath the button Add CoronaSky environment .
If we click on it automatically CoronaSky Map invited as wallpaper (also to be found via rendering> Environment-> Background-> Environment Map) . From now on is CoronaSky with CoronaSun connected – so we change the position of CoronaSun’s change the properties of the sky. Yes, and what can I say – that’s it! Pretty simple and fast and you have already a solid daylight animation find many renderings ever fully sufficient as I:
Correct overexposure in rendering
If your light source should be very bright, it can happen that the rendering is totally exposed and has many large white area. But we can relatively easily influence the propagation strength (Exposure) of light. Rendering of you is „Corona virual framebuffer“ (VFB) appears. You can simply here while the image is rendered adapt certain values. Click to correct an overexposure to the ColorMap riders and reducing the value of exposure to the entire brightness of the image to reduce noise. Or you increase the value of highlight compression to areas requiring higher brightness to reduce.
affect color temperature rendering
The general color rendering in mood can you on the settings at „Setup Balance White“ rules. For most scenes a value between 4500-6500 good and convincing results should achieve. Depending on what mood you create with your rendering want but worth it here, other adjustments to make – just try around times.
Settings for softer shadows
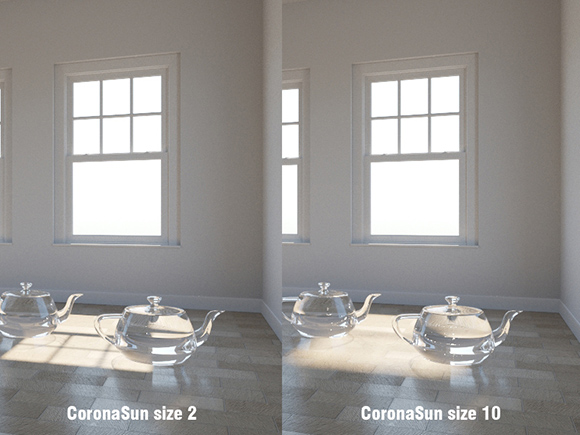
The default is for the intensity ( Intensity ) and size ( size ) of CoronaSun set a value of Figure 1. The intensity changes the brightness of the sun and the size influences the hardness of the shadows. Here I recommend rather a value of 2 as the shadows then something natural, or at least shown inconspicuous. Below is a comparison of times a value for size of CoronaSun of 2 and 10. FIG.
It can be seen but clearly the difference. This shows that you somehow can influence the most important parameter to be displayed with relatively simple settings. In other programs, such effects are ever like a little more complicated to adapt.
Another peculiarity of Corona is that the rendering process by itself does not stop – it renders once gradual ever. But we can have the time or runs determine via rendering> Render Setup> Scene parameters> General settings. For our tutorial we have all 100 passes set.
Rendering in daylight with cloudy sky
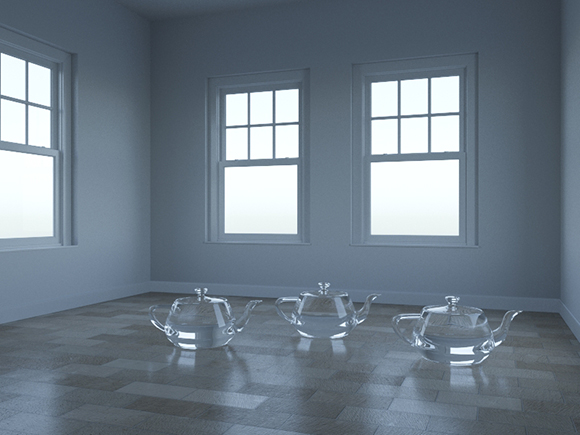
If you want more simulate a cloudy sky, it is also very simple: we have the sun off and expose only the CoronaSky map.
Simple right? But should still add a background image. We can either manually adjust ( rendering> Environment-> Background-> Environment Map) or just make an upright surface on which we map a sky image in the background of our scene.
One can also under Render Setup> Scene parameters> Scene Environment settings that the settings will be overwritten (direct / reflect / refract environment overrides). Another, more common method is a Corona Light material to generate and select Emit light to turn off, then a background image as Texmap load.
HDRI exposure in 3DS MAX
An alternative lighting methods is to use a HDR (high dynamic radiance) image – a graphic format, having also captured with the exposure intensity of the shooting scene. This exposure information we can use to our virtual scene to expose.
There are basically two types HDR employ images with Corona:
- Method 1: 3ds Max Environment
- Method 2: Corona Environment
HDRI as 3ds MAX Environment:
In 3ds Max, you can find over rendering> Environment-> Background-> Environment Map where you can invite the HDR image. Make sure that „real pixels“ is enabled and click OK. To better control this map have we pull the invitee image again from the Environment Map slot to a free slot in the Material Editor and select in the “ Instance“ – so, we would like that one instance is created. Changes that we make in Materialedito act now directly on the background Map under Environment from (around).
We should make sure that under Coordinates , Environ activated and mapping on spherical is set – as well as our bitmap settings.
From now on our HDR image both for illumination as well as the background image of the scene is used. The value for Offset allows us to heaven or to rotate (0 = 0 degrees, 1 = 360 degrees, a half turn accordingly corresponds to 0.5).
Lo and behold, in the background (if here now even slightly on the left pane) of the sky seen:
HDRI als Corona Environment:
The second option also Corona can define the background image. Here you go about Render Setup> Scene parameters> Scene Environment and change under Scene environment of use 3ds max settings to use Corona . Then we load our image in the Corona’s Environment slot. With these settings, the own 3DS MAX is ignored environmental record (Environment slot). There is really no difference in render quality or performance.
A disadvantage in this method is that you now can not affect the position of the sun.
Combination of HDRI and CoronaSun
But you can also use both methods together in order to have all the benefits and freedoms. If we CoronaSun will link with the ambient Map this synchronized – even if we turn something as. With this little trick, we again have the full control of the Corona Sun, as well as realistic and natural diffused light and the HDR image as wallpaper in our scene. Too complicated formulated? OK just try it out:
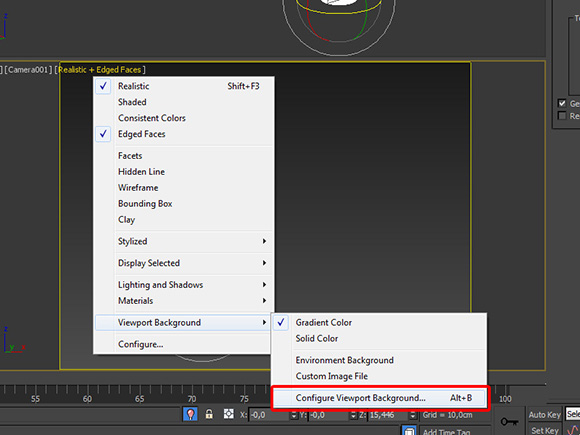
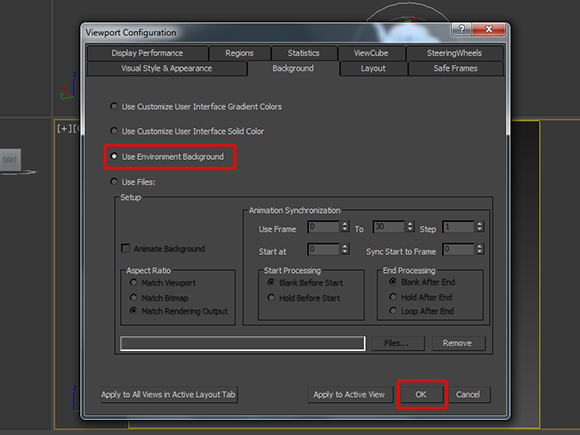
We first create a CoronaSun without a CoronaSky create and upload an HDR image in the Environment slot. In the settings for viewport (Alt + B) we select Use Environment Background and our HDR image is now displayed on the preview screen.
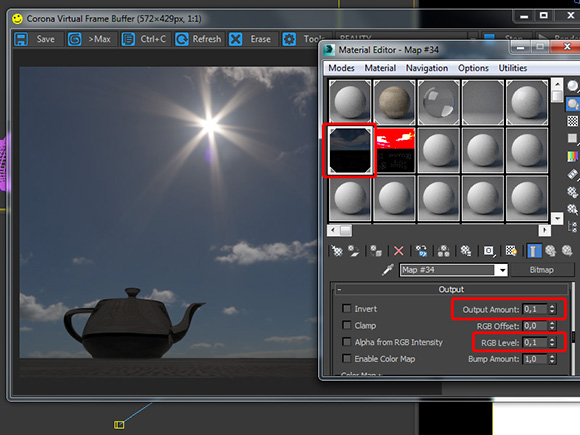
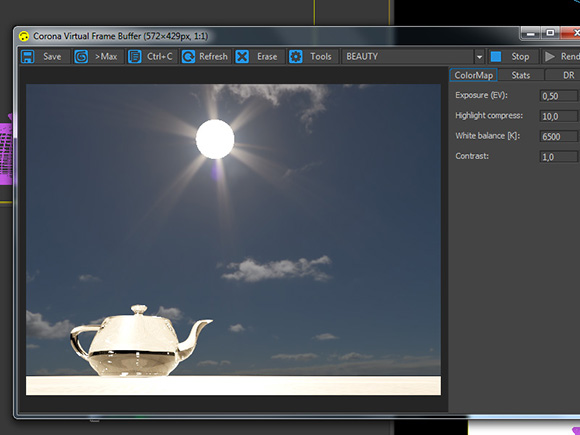
To find the HDR sun we reduce the value in the Material Editor Output Amount and the RGB Level .
We change the camera angle to now track the sun and direct the CoronaSun and the sun from the HDRI image, so they fit perfectly superimposed.
Next, we link the CoronaSun with their destination.
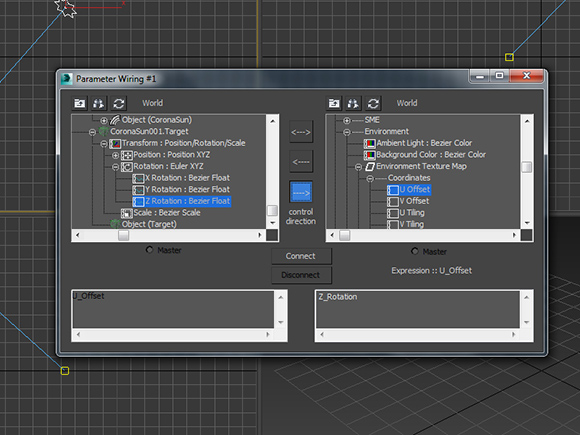
Go through this > Wire PARAMETERS> Parameter Wire dialog Animation- and a window appears. From the left column, we choose here the Zposition: BezierFloat (to be found under CoronaSun001.Target-> Transform: Position / Rotation / Scale> Position: Position XYZ) and the right column the uOffset under Environment Texture map-> Coordinates ,
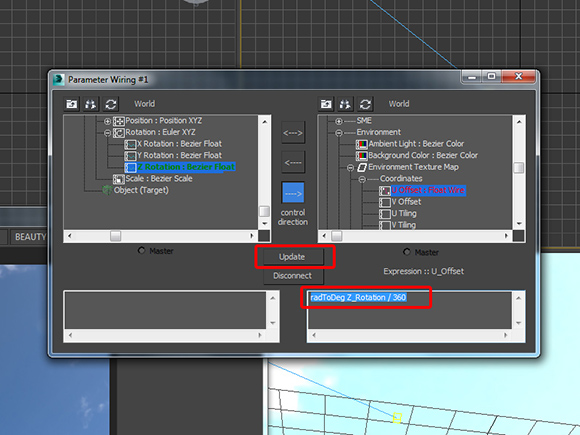
Now click the arrow in the middle copy the code “ radToDeg Z_rotation / 360 “ in the bottom right window as shown here:
Then again „Update“ button and that’s it!
From now on, everything revolves together and we must not continue to align the individual elements of CoronaSun or the HDR environment image! Exposure and image are therefore linked! Very convenient, especially if you want to render different exposure directions for its interior or even test.
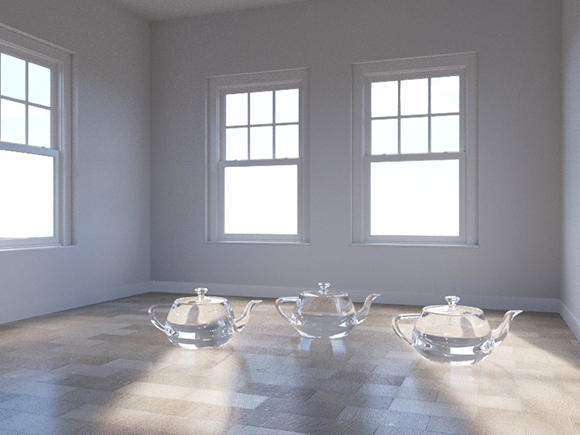
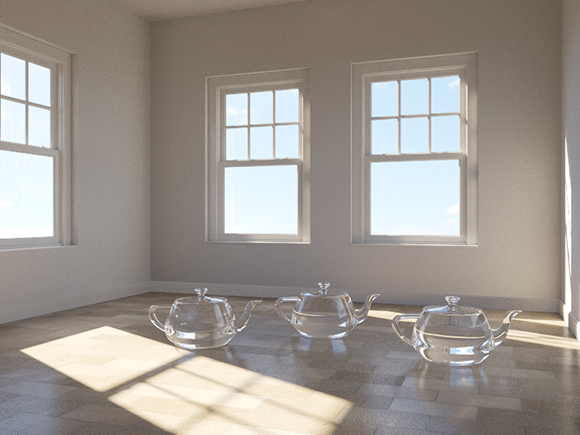
Not forgotten the values for Output Amount and the RGB level reset, which we have adapted to our processing phase. Then, the rendering of the interior looks in daylight like this:
Conclusion for Corona Rendering Tutorial
OK – I hope you have this small view like in the times we have taken care especially to the rendering engine Corona in combination with 3DS MAX. I think you can get a feel for it but is fairly easy to render a realistic animation daylight of an interior space and at really simple settings. Here is I think also the advantage of Corona. Hope you got something like sometimes with Render plugin Corona play around and collect your own experience in your next architectural visualization – Happy rendering!


Schreibe einen Kommentar